You’d be amazed at the number of foods to grill while camping. Everything from breakfast, lunch, dinner, and even dessert can be thrown on your camping grill.
Here are 34 foods you can grill on your next camping trip.
1. Corn on the Cob
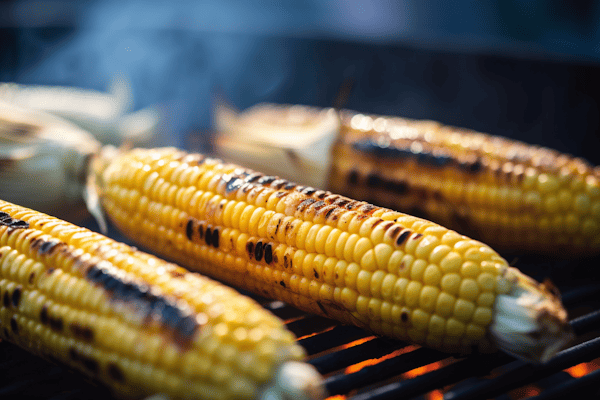
Grill it in the husk for a smoky, delicious side dish. There’s just something so summery about corn on the cob.
Here are some tips for grilling corn on the cob.
| What to do | How to do it |
|---|---|
| Choose fresh corn | Look for fresh corn with bright green husks and plump kernels. The husks should be tightly wrapped and free from browning or wilting. |
| Preheat the grill | Preheat your grill to medium-high heat for even cooking and to achieve beautiful grill marks. |
| Prepare the corn | Remove the outer husks, leaving the inner layers intact. Gently peel back the inner husks, remove the silk threads, and fold the husks back over the corn. |
| Soak in water (optional) | Soak the corn in cold water for 15-30 minutes before grilling if you prefer more steamed corn. This helps prevent the husks from burning too quickly. |
| Oil or butter the corn | Lightly brush the corn with melted butter or olive oil to enhance flavor and prevent drying during grilling. |
| Seasoning options | Experiment with seasonings like salt, pepper, garlic powder, chili powder, paprika, or herbs to add flavor. |
| Grill over direct heat | Place the corn directly on the grill grates over medium-high heat. Rotate the corn occasionally for even cooking and to prevent burning. |
| Grill with husks on or off | Choose to grill with husks on for steamed corn or with husks off for a charred, smoky flavor. |
| Grilling with husks on | Cook with husks on for 10-15 minutes, turning occasionally, until kernels are tender and husks are charred. |
| Grilling with husks off | Cook with husks removed or folded back for 8-10 minutes, turning occasionally, until kernels are tender with grill marks. |
| Baste with butter or sauce | Optional: Baste the corn with melted butter or barbecue sauce during the last few minutes of grilling for added flavor. |
| Serve and enjoy | Once cooked to your liking, remove from the grill, let cool for a few minutes, and serve. Add additional toppings like grated cheese, lime juice, or chopped herbs if desired. |
2. Grilled Banana Boats
Slice a banana lengthways (keep the skin), stuff it with chocolate and marshmallows, wrap it in foil, and grill. It’s like a handheld banana split!
3. Grilled Burgers
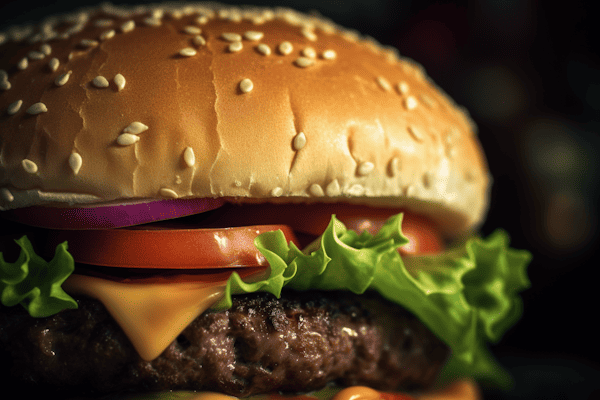
Good old burgers are the classic grilled food. They’re super versatile and easy to prep ahead. Don’t forget the fixings!
Here are some tips you can use when grilling up hamburgers at your campsite.
| What to do | How to do it |
|---|---|
| Choose the right ground beef | Select ground beef with a higher fat content (around 80% lean) to keep the burgers juicy and flavorful. |
| Prepare the patties | Divide the ground beef into equal portions and gently form them into patties, about 1/2 to 3/4 inch thick. Make a slight indentation in the center of each patty to prevent it from puffing up during grilling. |
| Season the burgers | Season the patties generously with salt, pepper, and any other desired seasonings, such as garlic powder, onion powder, or your favorite spice blend. |
| Preheat the camping grill | Preheat your camping grill or portable charcoal grill over medium-high heat. Ensure the grill grates are clean and lightly oiled to prevent sticking. |
| Grill the burgers | Place the patties on the preheated grill and cook for approximately 4-6 minutes per side, or until the internal temperature reaches 160°F (71°C) for medium doneness. Flip the burgers only once to ensure proper searing and to prevent them from falling apart. |
| Rest the burgers | Once cooked, remove the burgers from the grill and let them rest for a few minutes. This allows the juices to redistribute and results in a juicier burger. |
| Customize with toppings | Serve the grilled burgers on the toasted buns and let everyone customize their burgers with toppings like lettuce, tomato, onion, pickles, condiments, and sauces. |
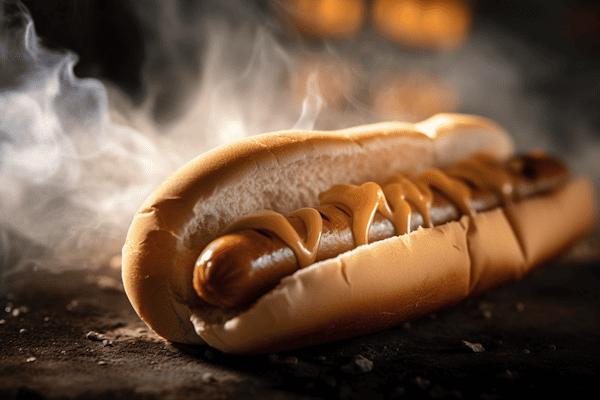
4. Hot Dogs
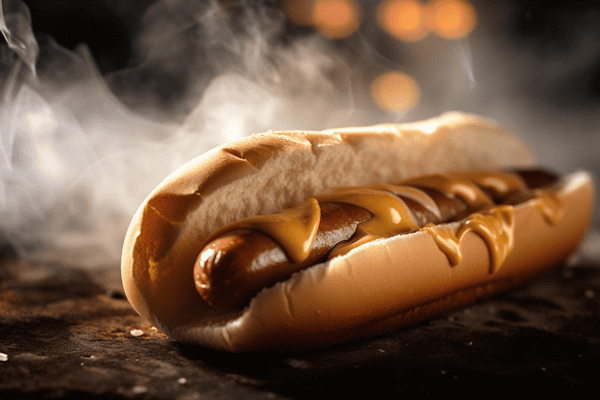
What’s easier than hot dogs? They’re easy to pack, super quick to grill, and loved by all.
Here are some tips to use when cooking grilled hot dogs.
| What to do | How to do it |
|---|---|
| Choose quality hot dogs | Select high-quality hot dogs made with beef, pork, or a combination for the best flavor. Look for options without artificial additives or fillers. |
| Preheat the camping grill | Preheat your camping grill or portable charcoal grill to medium-high heat. Ensure the grill grates are clean and lightly oiled to prevent sticking. |
| Score the hot dogs | Use a sharp knife to make shallow diagonal cuts on both sides of the hot dogs. This helps them cook evenly and creates a nice, caramelized texture. |
| Grill over medium heat | Place the scored hot dogs on the preheated grill over medium heat. Rotate them occasionally to ensure even cooking and prevent burning. |
| Toast the buns (optional) | Lightly butter the hot dog buns and place them on the grill, cut side down, for a minute or two until they are toasted and slightly crispy. |
| Prepare condiments and toppings | While the hot dogs are grilling, prepare condiments and toppings such as ketchup, mustard, relish, onions, sauerkraut, cheese, or any other preferred options. |
| Serve and enjoy | Once the hot dogs are cooked to your liking, remove them from the grill and place them in the toasted buns. Add condiments and toppings according to taste. |
5. Grilled Steak
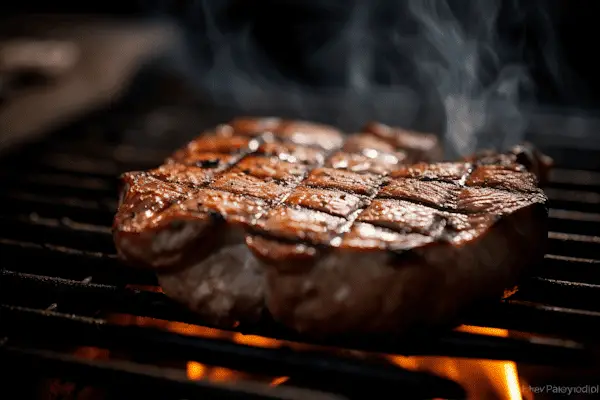
A juicy steak on the grill is such a treat when camping. It’s a little fancier, but why not splurge a bit when you’re in the great outdoors?
| What to do | How to do it |
|---|---|
| Choose the right steak | Select high-quality steaks like ribeye, New York strip, or filet mignon. Look for steaks with marbling for tenderness and flavor. |
| Season the steak | Season the steak generously with salt and pepper. Optionally, use additional seasonings like garlic powder, onion powder, or steak seasoning for added flavor. |
| Preheat the camping grill | Preheat your camping grill or portable charcoal grill to high heat. Ensure the grill grates are clean and lightly oiled to prevent sticking. |
| Sear the steak | Place the seasoned steak on the preheated grill and sear each side for 2-3 minutes to achieve a flavorful crust. Avoid excessive flipping to allow for a proper sear. |
| Adjust heat for the desired doneness | Reduce the heat to medium or move the steak to a cooler part of the grill. Continue grilling for additional time according to desired doneness: 4-5 minutes for medium-rare, 5-7 minutes for medium, or adjust based on personal preference. |
| Use a meat thermometer (optional) | For precise cooking, use a meat thermometer to check the internal temperature. Aim for 135°F (57°C) for medium-rare, 145°F (63°C) for medium, or adjust based on personal preference. Remove the steak from the grill and let it rest. |
| Rest and slice | Allow the steak to rest for a few minutes before slicing to retain juices. Slice the steak against the grain for maximum tenderness. |
6. Grilled Shish Kebabs
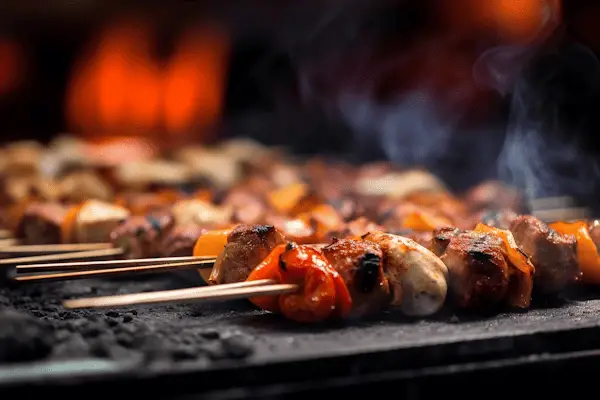
Kebabs are the best because you can make them with any combo of veggies and meats. Pre-assemble them for convenience.
| What to do | How to do it |
|---|---|
| Choose the right protein | Select your preferred protein for the kebabs, such as chicken, beef, lamb, or shrimp. Cut the protein into bite-sized pieces for easy grilling and eating. |
| Marinate for flavor | Marinate the protein in your favorite marinade for at least 30 minutes, or overnight if possible. This enhances the flavor and tenderizes the meat. |
| Prepare the vegetables | Cut vegetables into similar-sized pieces as the protein, such as bell peppers, onions, cherry tomatoes, or zucchini. Toss them with olive oil, salt, and pepper for added flavor. |
| Skewer the ingredients | Thread the marinated protein and vegetables onto skewers, alternating between different ingredients for variety. Leave a little space between each piece for even cooking. |
| Preheat the camping grill | Preheat your camping grill or portable charcoal grill to medium-high heat. Ensure the grill grates are clean and lightly oiled to prevent sticking. |
| Grill the shish kebabs | Place the skewers on the preheated grill and cook for approximately 10-15 minutes, turning occasionally, until the protein is cooked through and the vegetables are charred and tender. |
| Serve and enjoy | Once the shish kebabs are cooked to your liking, remove them from the grill and let them rest for a few minutes. Serve them as is or alongside rice, pita bread, or a refreshing salad. Enjoy the delicious flavors of your grilled shish kebabs! |
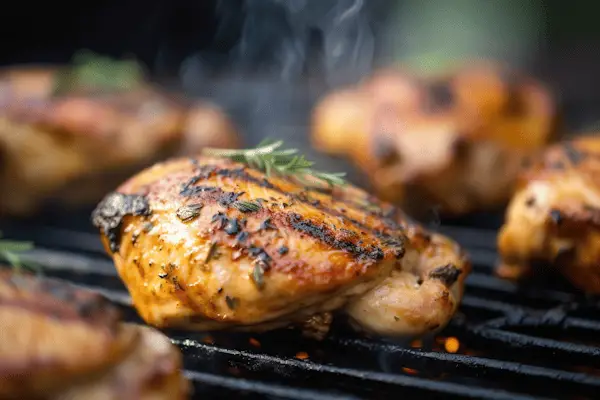
7. Grilled Chicken
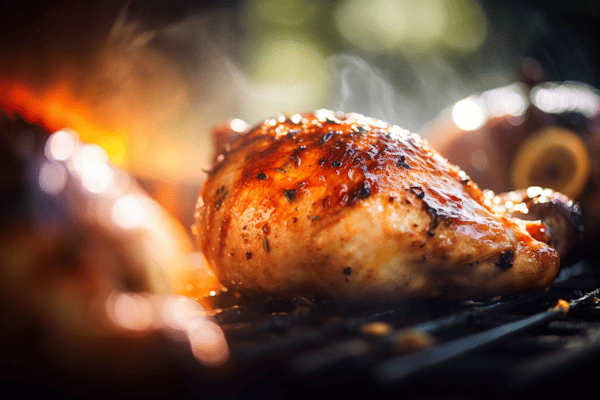
It’s healthy, easy to prep, and cooks fairly quickly. Marinate it ahead for maximum flavor.
| What to do | How to do it |
|---|---|
| Choose the right chicken | Select boneless, skinless chicken breasts, thighs, or drumsticks for easy grilling. If using bone-in pieces, adjust the cooking time accordingly. |
| Marinate for flavor | Marinate the chicken in your fridge before you leave for your trip. This enhances the flavor and helps tenderize the meat. |
| Preheat the camping grill | Preheat your camping grill or portable charcoal grill to medium-high heat. Ensure the grill grates are clean and lightly oiled to prevent sticking. |
| Grill over indirect heat | Place the chicken on the preheated grill over indirect heat, away from direct flames. This helps prevent flare-ups and allows the chicken to cook evenly without burning. |
| Cook with the lid closed | Close the grill lid to create an oven-like environment and ensure even cooking. Flip the chicken occasionally for uniform browning and to prevent sticking. |
| Use a meat thermometer (optional) | For precise cooking, use a meat thermometer to check the internal temperature. Cook until the chicken reaches an internal temperature of 165°F (74°C) for safe consumption. Remove from the grill and let it rest for a few minutes. |
| Serve and enjoy | Once the chicken is cooked through and has rested, serve it as a main dish or use it in salads, sandwiches, or wraps. Enjoy the delicious flavors of your grilled chicken while camping! |
8. Grilled Pork Chops

These are so hearty and satisfying. Grill them with some simple seasonings and enjoy a feast.
| What to do | How to do it |
|---|---|
| Choose the right pork chops | Select bone-in or boneless pork chops of medium thickness (about 1 inch) for grilling. Look for chops with a nice marbling of fat for added flavor and juiciness. |
| Season the pork chops | Season the pork chops with salt, pepper, and any other desired seasonings, such as garlic powder, paprika, or a favorite pork seasoning blend. |
| Preheat the camping grill | Preheat your camping grill or portable charcoal grill to medium-high heat. Ensure the grill grates are clean and lightly oiled to prevent sticking. |
| Grill over direct heat | Place the pork chops directly on the preheated grill over medium-high heat. Grill for approximately 4-5 minutes per side, or until the internal temperature reaches 145°F (63°C) for medium doneness. Flip the chops only once. |
| Use a meat thermometer (optional) | For precise cooking, use a meat thermometer to check the internal temperature of the pork chops. Aim for an internal temperature of 145°F (63°C) for medium doneness. Remove the chops from the grill and let them rest for a few minutes. |
| Rest and serve | Once cooked, remove the pork chops from the grill and let them rest for a few minutes. This allows the juices to redistribute and results in a juicier and more tender chop. Serve the pork chops hot and enjoy! |
| Customize with sauces (optional) | Optionally, serve the grilled pork chops with your favorite barbecue sauce, apple sauce, or other condiments and garnishes to enhance the flavors according to your taste preferences. |
9. Grilled Salmon

Bring a bit of foil, and you’ve got a healthy, easy-to-cook dinner that’s just a bit gourmet.
| What to do | How to do it |
|---|---|
| Choose fresh salmon | Select fresh salmon fillets or steaks with firm, bright flesh. Look for fish with no signs of discoloration or strong odors. |
| Season the salmon | Season the salmon with salt, pepper, and any other desired seasonings, such as dill, lemon zest, or garlic powder. Optionally, brush the salmon with olive oil to prevent sticking and add flavor. |
| Preheat the camping grill | Preheat your camping grill or portable charcoal grill to medium-high heat. Ensure the grill grates are clean and lightly oiled to prevent sticking. |
| Grill over indirect heat | Place the salmon on the preheated grill over indirect heat, skin-side down. This helps prevent the fish from sticking to the grill grates and promotes even cooking. |
| Cook with lid closed | Close the grill lid to create an oven-like environment and ensure even cooking. Grill the salmon for approximately 4-6 minutes per side, depending on the thickness of the fillets or steaks, until the fish is cooked through and flakes easily. |
| Use a fish spatula (optional) | To ensure the salmon stays intact, use a fish spatula to carefully flip the fillets or steaks. This helps prevent the fish from breaking apart during grilling. |
| Serve and enjoy | Once the salmon is cooked to your liking, remove it from the grill and let it rest for a few minutes. Serve the grilled salmon hot and enjoy the flavorful and flaky fish while camping! |
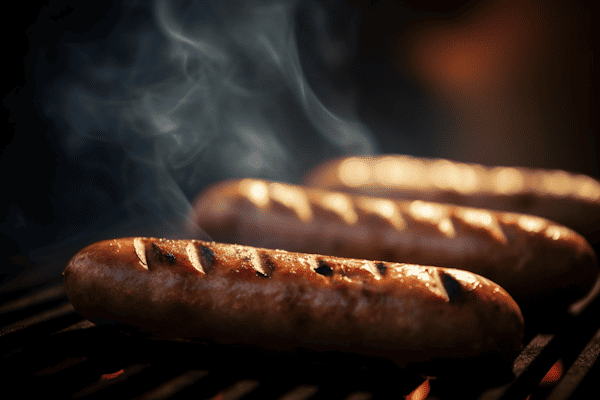
10. Grilled Sausages
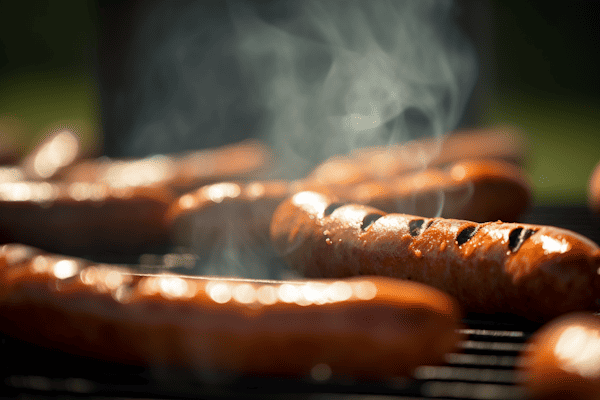
So many varieties, so little time! Sausages are a fun, easy, and flavorful option for the grill.
| What to do | How to do it |
|---|---|
| Choose your favorite sausages | Select your favorite types of sausage, such as bratwurst, Italian sausage, or chorizo. Choose sausages that are fully cooked or require minimal cooking time for convenience while camping. |
| Prick the sausages | Use a fork or toothpick to prick the sausages in a few places. This helps release excess fat and prevents them from bursting during grilling. |
| Preheat the camping grill | Preheat your camping grill or portable charcoal grill to medium heat. Ensure the grill grates are clean and lightly oiled to prevent sticking. |
| Grill over medium heat | Place the sausages on the preheated grill over medium heat. Grill them for approximately 12-15 minutes, turning occasionally, until they are evenly browned and heated through. |
| Use indirect heat if needed | If the sausages are browning too quickly or starting to char, move them to indirect heat by placing them to the side of the grill away from direct flames. This allows them to cook more gently and evenly. |
| Check for doneness | To ensure the sausages are fully cooked, check their internal temperature with a meat thermometer. The sausages should reach an internal temperature of 160°F (71°C) for safe consumption. |
| Serve and enjoy | Once the sausages are cooked to perfection, remove them from the grill and let them rest for a few minutes. Serve them in buns or alongside your favorite accompaniments such as mustard, sauerkraut, or grilled onions. Enjoy your grilled sausages while camping! |
11. Grilled Bell Peppers
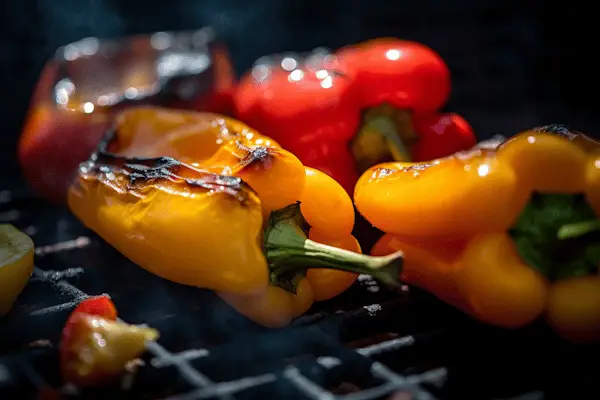
Cut ’em in half, remove the seeds, and grill them up for a sweet and smoky side. Plus, they’re pretty healthy!
| What to do | How to do it |
|---|---|
| Choose fresh bell peppers | Select fresh bell peppers with vibrant colors and firm skin. Look for peppers that are free from blemishes or soft spots. |
| Preheat the camping grill | Preheat your camping grill or portable charcoal grill to medium-high heat. Ensure the grill grates are clean and lightly oiled to prevent sticking. |
| Prepare the bell peppers | Wash the bell peppers and pat them dry. Remove the stem, seeds, and membrane from the peppers. Cut them into halves, quarters, or thick slices, depending on your preference. |
| Season with oil and spices | Drizzle the bell peppers with olive oil and sprinkle them with salt, pepper, and any desired spices or herbs. Toss the peppers to ensure they are evenly coated with the seasonings. |
| Grill over direct heat | Place the seasoned bell peppers directly on the preheated grill over medium-high heat. Grill them for approximately 4-6 minutes per side, or until they are tender and have grill marks. |
| Adjust cooking time for thickness | Thicker slices or halves may require a slightly longer grilling time, while thinner slices may cook more quickly. Adjust the cooking time accordingly to ensure the bell peppers are cooked to your desired tenderness. |
| Remove from the grill and serve | Once the bell peppers are grilled to your liking, remove them from the grill and let them cool slightly. Serve them as a side dish, in salads, sandwiches, or use them as a topping for burgers and tacos. Enjoy your grilled bell peppers while camping! |
12. Grilled Pineapple
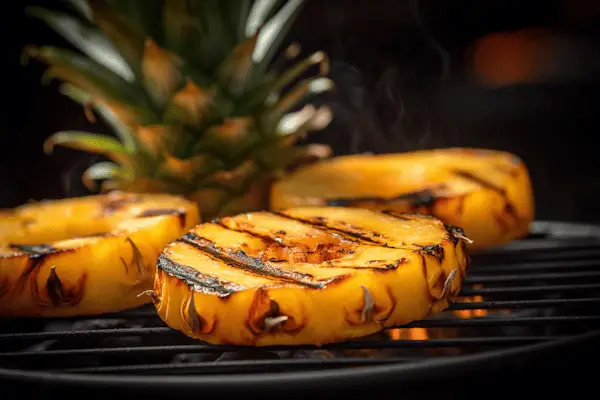
It’s like dessert on the grill. The heat caramelizes the sugars, making the pineapple even more delicious.
| What to do | How to do it |
|---|---|
| Choose ripe pineapples | Select ripe pineapples with a fragrant aroma and golden skin. Avoid pineapples with overly soft spots or a fermented smell. |
| Preheat the camping grill | Preheat your camping grill or portable charcoal grill to medium-high heat. Ensure the grill grates are clean and lightly oiled to prevent sticking. |
| Prepare the pineapples | Cut off the top and bottom of the pineapple, then slice off the skin. Remove any remaining “eyes” using a paring knife. Cut the pineapple into rings or wedges, about 1/2 to 3/4 inch thick. |
| Brush with oil (optional) | Lightly brush the pineapple slices with oil to prevent sticking and add a touch of flavor. This step is optional since pineapples are naturally juicy and don’t require oil for grilling. |
| Grill over medium-high heat | Place the pineapple slices directly on the preheated grill over medium-high heat. Grill for approximately 2-3 minutes per side, or until grill marks appear and the pineapple caramelizes slightly. |
| Adjust cooking time for thickness | Thicker pineapple slices may require a slightly longer grilling time, while thinner slices may cook more quickly. Adjust the cooking time accordingly to achieve desired caramelization and tenderness. |
| Serve and enjoy | Once the pineapple slices are grilled to your liking, remove them from the grill and let them cool for a minute. Serve them as a side dish, dessert, or as a topping for grilled meats. Enjoy the delicious flavors of grilled pineapples while camping! |
13. Grilled Zucchini
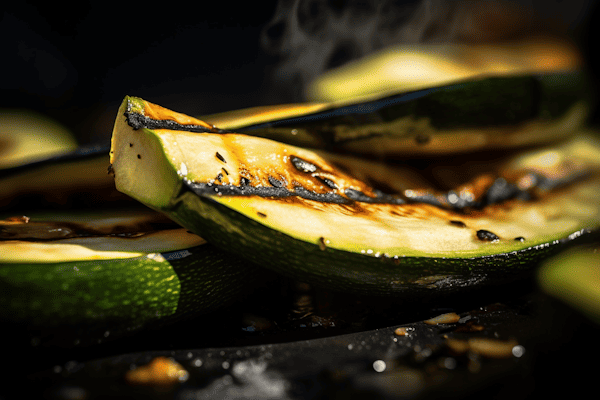
Slice it longways and grill. So simple, but the char gives zucchini a whole new flavor profile.
| What to do | How to do it |
|---|---|
| Choose fresh zucchini | Select fresh zucchini with firm texture and vibrant color. Look for zucchini without blemishes or soft spots. |
| Preheat the camping grill | Preheat your camping grill or portable charcoal grill to medium-high heat. Ensure the grill grates are clean and lightly oiled to prevent sticking. |
| Prepare the zucchini | Wash the zucchini and trim off the ends. Cut the zucchini lengthwise into slices or halves, about 1/4 to 1/2 inch thick. |
| Season with oil and spices | Drizzle the zucchini slices with olive oil and sprinkle them with salt, pepper, and any desired spices or herbs. Toss the zucchini to ensure they are evenly coated with the seasonings. |
| Grill over medium-high heat | Place the seasoned zucchini directly on the preheated grill over medium-high heat. Grill for approximately 2-3 minutes per side, or until grill marks appear and the zucchini is tender. Flip the slices or halves only once during grilling. |
| Adjust cooking time for thickness | Thicker zucchini slices may require a slightly longer grilling time, while thinner slices may cook more quickly. Adjust the cooking time accordingly to achieve desired tenderness. |
| Serve and enjoy | Once the zucchini is grilled to your liking, remove it from the grill and let it cool for a minute. Serve the grilled zucchini as a side dish, in salads, sandwiches, or use them as a topping for pizzas or grilled meats. Enjoy! |
14. Grilled Asparagus
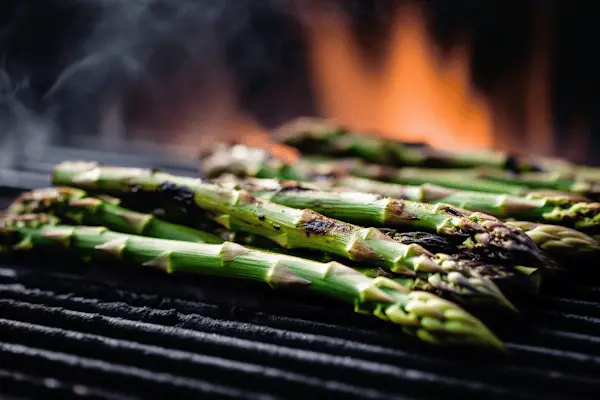
A quick, healthy side that cooks up in minutes. Plus, it’ll make your camp meal look gourmet.
| What to do | How to do it |
|---|---|
| Choose fresh asparagus | Select fresh asparagus spears with firm texture and vibrant green color. Look for spears that are not wilted or slimy. |
| Preheat the camping grill | Preheat your camping grill or portable charcoal grill to medium-high heat. Ensure the grill grates are clean and lightly oiled to prevent sticking. |
| Prepare the asparagus | Wash the asparagus spears and trim off the tough ends. If desired, peel the lower portion of the spears for a more tender texture. |
| Season with oil and spices | Drizzle the asparagus spears with olive oil and sprinkle them with salt, pepper, and any desired spices or herbs. Toss the asparagus to ensure they are evenly coated with the seasonings. |
| Grill over medium-high heat | Place the seasoned asparagus directly on the preheated grill over medium-high heat. Grill for approximately 4-6 minutes, turning occasionally, or until the asparagus is tender and lightly charred. |
| Adjust cooking time for thickness | Thicker asparagus spears may require a slightly longer grilling time, while thinner spears may cook more quickly. Adjust the cooking time accordingly to achieve desired tenderness. |
| Serve and enjoy | Once the asparagus is grilled to your liking, remove it from the grill and let it cool for a minute. Serve the grilled asparagus as a side dish, in salads, or as an accompaniment to main dishes. Enjoy the delicious flavors of grilled asparagus while camping! |
15. Grilled Bratwurst
Just like hot dogs but with a bit more flavor. Brats on the grill are a camping classic.
| What to do | How to do it |
|---|---|
| Choose your favorite bratwurst | Select your favorite type of bratwurst, such as traditional, beer-infused, or flavored varieties. Look for bratwurst with quality ingredients and good flavor. |
| Preheat the camping grill | Preheat your camping grill or portable charcoal grill to medium heat. Ensure the grill grates are clean and lightly oiled to prevent sticking. |
| Parboil the bratwurst (optional) | Parboil the bratwurst in simmering water or beer for about 10 minutes before grilling. This helps ensure they cook evenly and reduces the grilling time. |
| Grill over medium heat | Place the bratwurst on the preheated grill over medium heat. Grill for approximately 10-12 minutes, turning occasionally, until they are evenly browned and cooked through. |
| Use indirect heat if needed | If the bratwurst are browning too quickly or starting to char, move them to indirect heat by placing them to the side of the grill away from direct flames. This allows them to cook more gently and evenly. |
| Check for doneness | To ensure the bratwurst are fully cooked, check their internal temperature with a meat thermometer. The bratwurst should reach an internal temperature of 160°F (71°C) for safe consumption. |
| Serve and enjoy | Once the bratwurst are cooked to perfection, remove them from the grill and let them rest for a few minutes. Serve them in buns or alongside your favorite accompaniments such as sauerkraut, mustard, or grilled onions. Enjoy your grilled bratwurst while camping! |
16. Grilled Skirt Steak
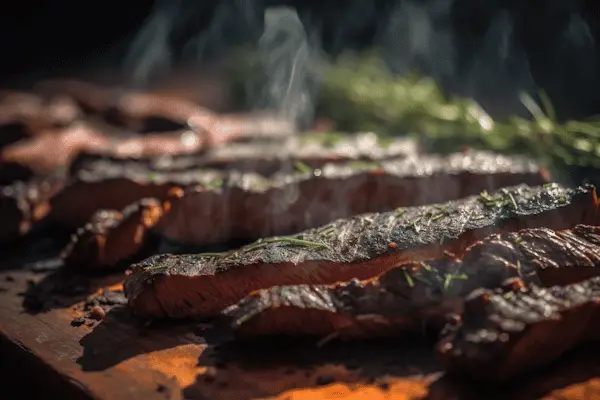
Fast cooking and flavorful, this is a great cut for camping. Throw it in a tortilla with some salsa, and voila – steak tacos!
| What to do | How to do it |
|---|---|
| Choose quality skirt steak | Select a high-quality skirt steak with good marbling for flavor and tenderness. Look for steaks that are bright red in color and have minimal visible connective tissue. |
| Marinate for flavor | Marinate the skirt steak in your favorite marinade for at least 30 minutes, or overnight if possible. This helps enhance the flavor and tenderize the meat. |
| Preheat the camping grill | Preheat your camping grill or portable charcoal grill to high heat. Ensure the grill grates are clean and lightly oiled to prevent sticking. |
| Grill over direct heat | Place the skirt steak directly on the preheated grill over high heat. Grill for approximately 2-4 minutes per side, or until it reaches your desired level of doneness. |
| Use a meat thermometer (optional) | For precise cooking, use a meat thermometer to check the internal temperature of the steak. Skirt steak is typically cooked to medium-rare or medium, with an internal temperature of 130-135°F (54-57°C). |
| Rest and slice | Once cooked to your liking, remove the skirt steak from the grill and let it rest for a few minutes. This allows the juices to redistribute and results in a more tender and flavorful steak. Slice the steak against the grain for maximum tenderness. |
| Serve and enjoy | Serve the grilled skirt steak as a main dish or use it in fajitas, tacos, salads, or sandwiches. Pair it with your favorite side dishes and sauces for a delicious and satisfying meal while camping. Enjoy! |
17. Grilled Eggplant
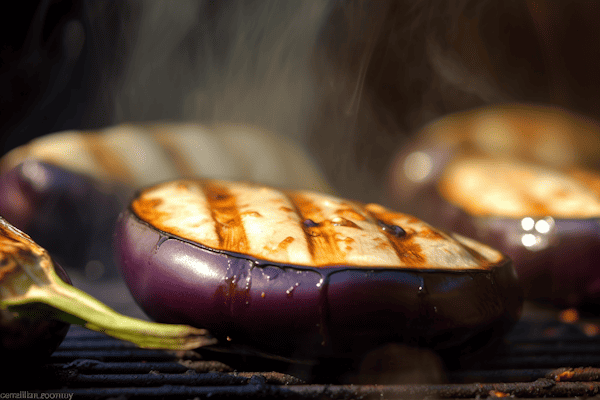
Cut into thick slices, brushed with olive oil, this makes a great side or vegetarian main dish.
| What to do | How to do it |
|---|---|
| Choose fresh eggplant | Select fresh eggplants with shiny skin and no blemishes. Look for eggplants that feel heavy for their size. |
| Preheat the camping grill | Preheat your camping grill or portable charcoal grill to medium-high heat. Ensure the grill grates are clean and lightly oiled to prevent sticking. |
| Prepare the eggplant | Wash the eggplant and cut off the top and bottom. Slice the eggplant into rounds, about 1/2 to 3/4 inch thick. |
| Season with oil and spices | Brush both sides of the eggplant slices with olive oil and sprinkle them with salt, pepper, and any desired spices or herbs. Ensure the eggplant slices are evenly coated with the seasonings. |
| Grill over medium-high heat | Place the seasoned eggplant slices directly on the preheated grill over medium-high heat. Grill for approximately 3-5 minutes per side, or until the eggplant is tender and has grill marks. |
| Adjust cooking time for thickness | Thicker eggplant slices may require a slightly longer grilling time, while thinner slices may cook more quickly. Adjust the cooking time accordingly to achieve desired tenderness. |
| Serve and enjoy | Once the eggplant is grilled to your liking, remove it from the grill and let it cool for a minute. Serve the grilled eggplant as a side dish, in salads, or use it as a base for other recipes like eggplant parmesan or sandwiches. Enjoy! |
18. Grilled Halloumi Cheese
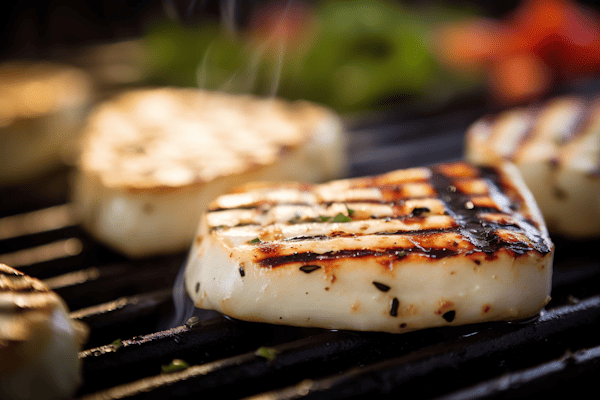
This firm cheese holds up to the grill. It’s a bit salty, a bit squeaky, and a lot delicious.
| What to do | How to do it |
|---|---|
| Choose firm halloumi cheese | Select firm halloumi cheese that is suitable for grilling. Look for halloumi with a firm texture and a golden color. |
| Preheat the camping grill | Preheat your camping grill or portable charcoal grill to medium-high heat. Ensure the grill grates are clean and lightly oiled to prevent sticking. |
| Slice the halloumi cheese | Cut the halloumi cheese into slices of about 1/4 to 1/2 inch thick. |
| Grill over medium-high heat | Place the halloumi cheese slices directly on the preheated grill over medium-high heat. Grill for approximately 1-2 minutes per side, or until grill marks appear and the cheese softens slightly. |
| Avoid excessive flipping | To prevent the cheese from sticking and breaking, avoid excessive flipping. Grill each side just once to achieve grill marks and allow the cheese to develop a slightly crispy exterior. |
| Serve immediately | Once the halloumi cheese is grilled to your liking, remove it from the grill and serve it immediately while it is still warm and soft. |
| Enhance with toppings (optional) | Optionally, enhance the grilled halloumi cheese with toppings like a drizzle of olive oil, a squeeze of lemon juice, fresh herbs, or a sprinkle of chili flakes for added flavor. |
19. Grilled Ribs
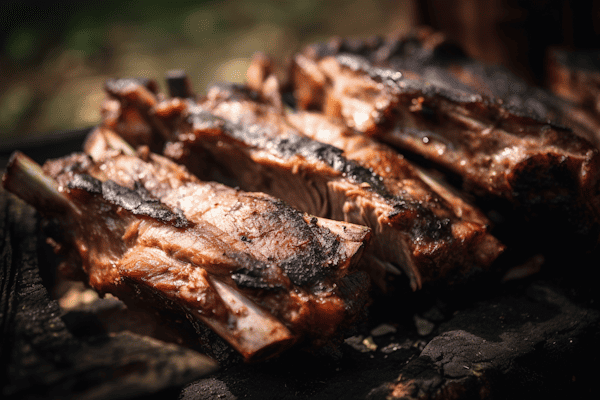
Okay, these are a bit more work, but boy, are they worth it. Nothing says ‘outdoor cooking’ like ribs on the grill.
| What to do | How to do it |
|---|---|
| Choose your preferred type of ribs | Select your preferred type of ribs, such as baby back ribs or spare ribs. Ensure they are fresh and properly trimmed. |
| Remove the membrane | On the bone side of the ribs, locate the thin membrane and peel it off using a butter knife or your fingers. This helps tenderize the meat and allows the flavors to penetrate better during grilling. |
| Season the ribs | Season the ribs generously with a dry rub or marinade of your choice. Ensure the ribs are evenly coated, covering both sides. |
| Preheat the camping grill | Preheat your camping grill or portable charcoal grill to low or indirect heat. Maintain a temperature around 225-250°F (107-121°C) throughout the cooking process. |
| Grill the ribs | Place the ribs on the grill, bone side down, away from direct heat. Close the lid and cook them low and slow for 2-3 hours, or until the meat is tender and pulls away from the bone. |
| Apply barbecue sauce (optional) | If desired, brush the ribs with barbecue sauce during the last 30 minutes of cooking. Apply additional layers of sauce, allowing each layer to caramelize before adding the next. |
| Rest and serve | Once the ribs are cooked to perfection, remove them from the grill and let them rest for a few minutes. Slice the ribs between the bones and serve them with additional barbecue sauce on the side. Enjoy the delicious grilled ribs while camping! |
20. Grilled Potatoes
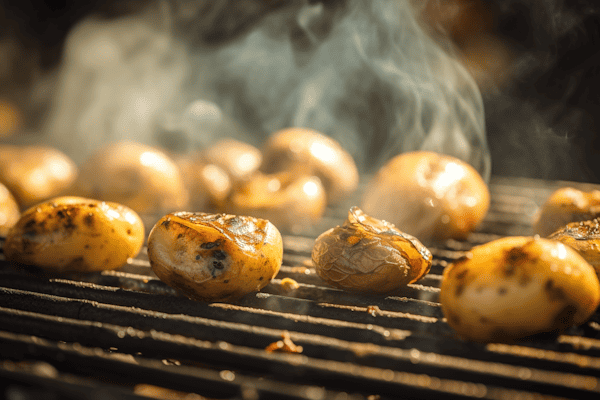
Wrap them in foil and throw them on the grill. They’ll take a while, but they’re so worth the wait.
| What to do | How to do it |
|---|---|
| Choose the right potatoes | Select potatoes suitable for grilling, such as russet or Yukon Gold potatoes. Choose potatoes that are firm, with smooth skin and no green spots. |
| Parboil the potatoes (optional) | If desired, parboil the potatoes in a pot of boiling water for 10-15 minutes before grilling. This helps to partially cook the potatoes and reduce grilling time. |
| Precook the potatoes (optional) | Alternatively, precook the potatoes in the microwave for a few minutes until slightly tender. This speeds up the grilling process. |
| Cut the potatoes into chunks | Cut the potatoes into chunks or thick slices, about 1/2 to 3/4 inch in size. Ensure the pieces are relatively uniform for even cooking. |
| Season with oil and spices | Drizzle the potato chunks with olive oil and season them with salt, pepper, and any desired spices or herbs. Toss the potatoes to coat them evenly with the seasonings. |
| Grill over medium heat | Place the seasoned potato chunks directly on the preheated grill over medium heat. Grill for approximately 15-20 minutes, turning occasionally, until the potatoes are tender and have a golden-brown crust. |
| Serve and enjoy | Once the potatoes are grilled to your liking, remove them from the grill and let them cool for a few minutes. Serve the grilled potatoes as a side dish or use them in salads, tacos, or other recipes. Enjoy the delicious grilled potatoes while camping! |
21. Grilled Shrimp Skewers
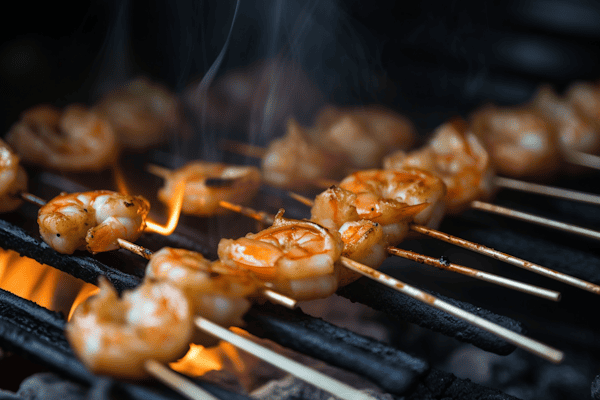
Fast, easy, and a little fancy. Shrimp on the skewer is a light, protein-packed grilling option.
| What to do | How to do it |
|---|---|
| Choose fresh shrimp | Select fresh shrimp with firm texture and a mild, sweet scent. Look for shrimp that are deveined and peeled for convenience. |
| Soak wooden skewers (if using) | If using wooden skewers, soak them in water for about 30 minutes before grilling. This prevents them from burning during cooking. |
| Preheat the camping grill | Preheat your camping grill or portable charcoal grill to medium-high heat. Ensure the grill grates are clean and lightly oiled to prevent sticking. |
| Season the shrimp | Season the shrimp with salt, pepper, and any desired spices or marinade for extra flavor. Toss the shrimp to ensure they are evenly coated with the seasonings. |
| Skewer the shrimp | Thread the seasoned shrimp onto skewers, piercing through both the tail and body to keep them secure. Leave a little space between each shrimp for even cooking. |
| Grill over direct heat | Place the shrimp skewers directly on the preheated grill over medium-high heat. Grill for approximately 2-3 minutes per side, or until the shrimp turn pink and opaque. Flip the skewers only once during grilling. |
| Serve and enjoy | Once the shrimp skewers are grilled to perfection, remove them from the grill and let them cool for a minute. Serve the shrimp skewers as an appetizer or main dish, and enjoy them with your favorite dipping sauce or alongside a fresh salad. |
22. Grilled Portobello Mushrooms

Big and meaty, these are great for vegetarians or as a different kind of side dish.
| What to do | How to do it |
|---|---|
| Choose fresh portobello mushrooms | Select fresh portobello mushrooms with firm caps and a rich, dark color. Look for mushrooms that are free from blemishes or signs of decay. |
| Clean the mushrooms | Gently clean the mushrooms using a damp cloth or paper towel to remove any dirt or debris. Avoid soaking them in water, as they can become waterlogged. |
| Remove the stem and gills | Trim off the tough stem of the mushroom and scrape out the gills using a spoon. This step is optional but can help create more space for toppings and prevent excess moisture during grilling. |
| Marinate or season the mushrooms | Optionally, marinate the mushrooms in a mixture of olive oil, garlic, herbs, and seasonings for added flavor. Alternatively, simply brush them with olive oil and season with salt and pepper. |
| Preheat the camping grill | Preheat your camping grill or portable charcoal grill to medium-high heat. Ensure the grill grates are clean and lightly oiled to prevent sticking. |
| Grill the mushrooms | Place the portobello mushrooms, cap side down, directly on the preheated grill over medium-high heat. Grill for approximately 4-6 minutes per side, or until they are tender and have grill marks. Flip the mushrooms only once during grilling. |
| Serve and enjoy | Once the mushrooms are grilled to your liking, remove them from the grill and let them cool for a minute. Serve the grilled portobello mushrooms as a main dish, in sandwiches, or as a topping for salads. Enjoy the delicious flavors while camping! |
23. Grilled Peaches
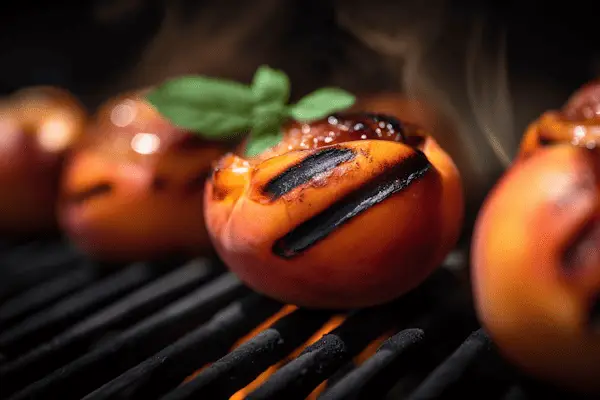
Halve them, pit them, and put them cut-side down on the grill. The heat makes them even sweeter and juicier.
| What to do | How to do it |
|---|---|
| Choose ripe peaches | Select ripe peaches that are fragrant and slightly soft to the touch. Look for peaches with vibrant colors and no signs of bruising or wrinkling. |
| Cut the peaches | Cut the peaches in half and remove the pit. You can leave the skin on or peel it off, depending on your preference. |
| Brush with oil (optional) | Optional: Brush the cut sides of the peaches with a little oil to prevent sticking and add flavor. |
| Preheat the camping grill | Preheat your camping grill or portable charcoal grill to medium heat. Ensure the grill grates are clean and lightly oiled to prevent sticking. |
| Grill over medium heat | Place the peach halves, cut side down, directly on the preheated grill over medium heat. Grill for approximately 2-3 minutes per side, or until the peaches are tender and have grill marks. |
| Adjust cooking time for ripeness | Adjust the cooking time based on the ripeness of the peaches. Riper peaches will cook more quickly, while firmer peaches may require a bit more time. |
| Serve and enjoy | Once the peaches are grilled to your liking, remove them from the grill and let them cool slightly. Serve the grilled peaches as a dessert, alongside ice cream or yogurt, or use them in salads or as a topping for grilled meats. Enjoy! |
24. Grilled Pizza

You heard me! Bring some pre-made dough, and you can make pizza right on the grill.
| What to do | How to do it |
|---|---|
| Prepare the pizza dough | Prepare or purchase pizza dough ahead of time. Ensure it is properly risen and ready for grilling. Divide the dough into individual-sized portions for personal pizzas. |
| Preheat the camping grill | Preheat your camping grill or portable charcoal grill to high heat. Ensure the grill grates are clean and lightly oiled to prevent sticking. |
| Roll out the pizza dough | On a lightly floured surface, roll out each portion of pizza dough into desired thickness and shape. |
| Grill one side of the dough | Carefully place the rolled-out dough directly on the preheated grill grates. Grill for about 2-3 minutes, or until the bottom is golden brown and grill marks appear. |
| Flip the dough and add toppings | Using tongs or a spatula, flip the dough over. Quickly add your desired pizza sauce, cheese, and toppings to the grilled side of the dough. |
| Close the grill and cook | Close the grill lid to create an oven-like environment. Cook the pizza for an additional 4-6 minutes, or until the cheese is melted, the toppings are cooked, and the crust is crispy. |
| Monitor the pizza and rotate if needed | Keep a close eye on the pizza while it cooks, as grilling times may vary. If one side of the pizza is cooking faster than the other, rotate it for even cooking. |
| Serve and enjoy | Once the pizza is cooked to your liking, carefully remove it from the grill. Let it cool for a minute, then slice and serve. Enjoy your delicious grilled pizza while camping! |
25. Grilled Fish Tacos
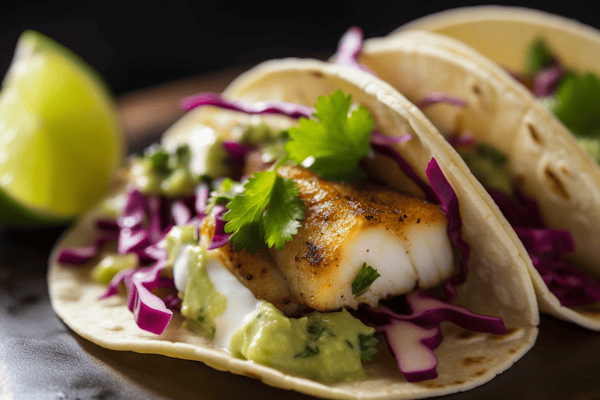
Grill a flaky white fish, flake it into a tortilla, and you’ve got fish tacos. It really is as simple as that!
| What to do | How to do it |
|---|---|
| Choose fresh fish | Select fresh fish fillets suitable for grilling, such as snapper, mahi-mahi, or tilapia. Look for firm, glossy flesh with no fishy odor. |
| Marinate the fish (optional) | Optional: Marinate the fish in a mixture of lime juice, garlic, and your preferred seasonings for 30 minutes to enhance the flavor. |
| Preheat the camping grill | Preheat your camping grill or portable charcoal grill to medium-high heat. Ensure the grill grates are clean and lightly oiled to prevent sticking. |
| Grill the fish fillets | Place the fish fillets directly on the preheated grill. Grill for about 3-4 minutes per side, or until the fish is opaque and easily flakes with a fork. |
| Warm tortillas | While the fish is grilling, warm the tortillas by placing them on the grill for a few seconds on each side until they are soft and pliable. Alternatively, wrap them in foil and place them on the grill to warm. |
| Assemble the fish tacos | Flake the grilled fish into smaller pieces and assemble the tacos by placing the fish on warm tortillas. Top with desired toppings such as shredded cabbage, salsa, avocado, lime, and cilantro. |
| Serve and enjoy | Serve the grilled fish tacos immediately. Garnish with additional toppings and serve with lime wedges on the side. Enjoy the delicious flavors of fish tacos while camping! |
26. Grilled Tofu
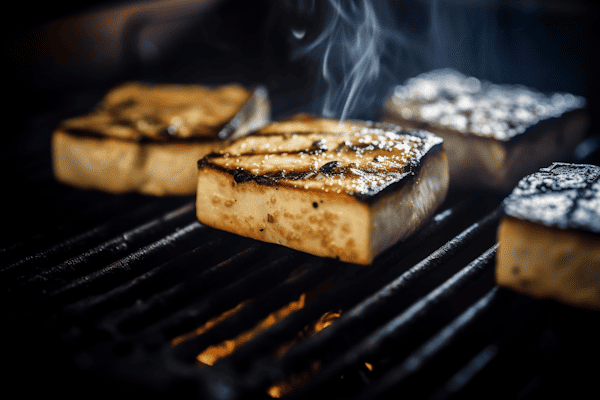
Don’t forget the vegans! Marinate it well, and it’ll pick up a lovely smoky flavor from the grill.
| What to do | How to do it |
|---|---|
| Choose firm tofu | Select firm or extra-firm tofu for grilling. Ensure the tofu is well-drained and pressed to remove excess moisture. |
| Pre-marinate the tofu (optional) | Optional: Pre-marinate the tofu in a flavorful sauce or marinade for at least 30 minutes, or overnight if possible. This enhances the taste and texture of the tofu. |
| Preheat the camping grill | Preheat your camping grill or portable charcoal grill to medium-high heat. Ensure the grill grates are clean and lightly oiled to prevent sticking. |
| Cut tofu into slices or cubes | Cut the tofu into slices or cubes of desired thickness. Pat them dry with a paper towel to remove any excess moisture. |
| Season or brush with sauce | Season the tofu slices or cubes with salt, pepper, and any desired spices or brush them with a flavorful sauce for extra taste. Ensure the tofu is evenly coated. |
| Grill over medium-high heat | Place the seasoned tofu directly on the preheated grill over medium-high heat. Grill for approximately 3-4 minutes per side, or until grill marks appear and the tofu is heated through. |
| Adjust cooking time for thickness | Adjust the grilling time based on the thickness of the tofu. Thicker pieces may require a slightly longer cooking time, while thinner ones will cook more quickly. |
| Serve and enjoy | Once the tofu is grilled to your liking, remove it from the grill and let it cool for a minute. Serve the grilled tofu as a main dish, in salads, sandwiches, or alongside your favorite side dishes. Enjoy the delicious grilled tofu while camping! |
27. Lamb Kebabs
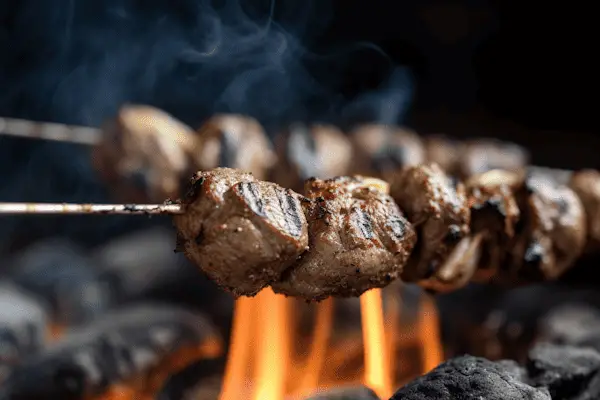
Lamb is such a robust meat, it stands up well to grilling. Plus, skewers are just plain fun to eat.
| What to do | How to do it |
|---|---|
| Choose quality lamb meat | Select high-quality lamb meat for your kebabs. Look for cuts like lamb leg or lamb shoulder, which are suitable for grilling. Ensure the meat is fresh, well-trimmed, and marbled for optimum flavor. |
| Cut lamb into cubes | Cut the lamb meat into evenly-sized cubes, about 1-1.5 inches in size. This ensures uniform cooking and helps the meat retain its juiciness. |
| Marinate the lamb (optional) | Optional: Marinate the lamb cubes in a mixture of olive oil, garlic, lemon juice, herbs, and spices. Allow the meat to marinate for at least 30 minutes, or overnight in the refrigerator, to enhance its flavor. |
| Preheat the camping grill | Preheat your camping grill or portable charcoal grill to medium-high heat. Ensure the grill grates are clean and lightly oiled to prevent sticking. |
| Skewer the lamb cubes | Thread the marinated lamb cubes onto skewers, alternating with vegetables or desired ingredients for added flavor. Leave a little space between each piece for even cooking. |
| Grill over medium-high heat | Place the lamb kebabs directly on the preheated grill over medium-high heat. Grill for approximately 3-5 minutes per side, or until the lamb is cooked to your preferred level of doneness. Turn the kebabs occasionally for even cooking. |
| Rest and serve | Once the lamb kebabs are cooked to your liking, remove them from the grill and let them rest for a few minutes. This allows the juices to redistribute, resulting in more tender and flavorful meat. Serve the kebabs hot and enjoy! |
28. Grilled Clams
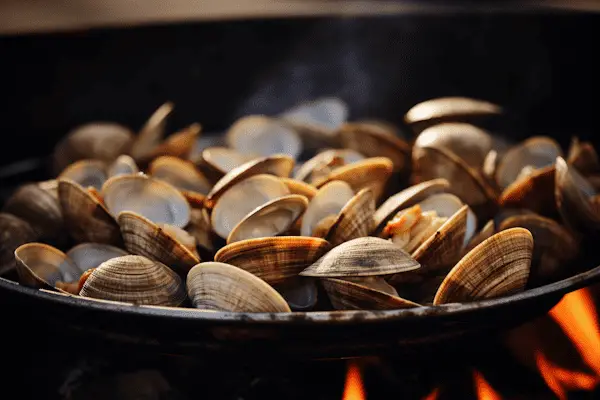
Bring a bit of the seaside to your camp. They steam in their own juices and taste just wonderful.
| What to do | How to do it |
|---|---|
| Choose fresh clams | Select fresh live clams from a reputable source. Look for clams with tightly closed shells or shells that close when tapped. Avoid clams with cracked or open shells, as they may be dead or spoiled. |
| Clean and purge the clams | Rinse the clams thoroughly under cold running water to remove any sand or debris. To help purge any remaining sand from the clams, soak them in a bowl of cold saltwater for about 20-30 minutes. |
| Preheat the camping grill | Preheat your camping grill or portable charcoal grill to medium-high heat. Ensure the grill grates are clean. |
| Arrange clams on the grill | Place the clams directly on the preheated grill grates, ensuring they are in a single layer and not overcrowded. Close the grill lid and cook for approximately 5-7 minutes, or until the clams open. |
| Discard unopened clams | Remove the clams from the grill as they open. Discard any clams that remain closed after cooking, as they may be dead and not safe to eat. |
| Serve and enjoy | Once cooked, remove the opened clams from their shells and serve them with melted butter, lemon wedges, or your favorite dipping sauces. |
| Handle with care | Take care when handling hot clams, as they can be very hot. Use tongs or a fork to remove them from the grill and protect your hands from the steam. Be cautious to avoid burns while enjoying your grilled clams. |
29. Grilled Oysters
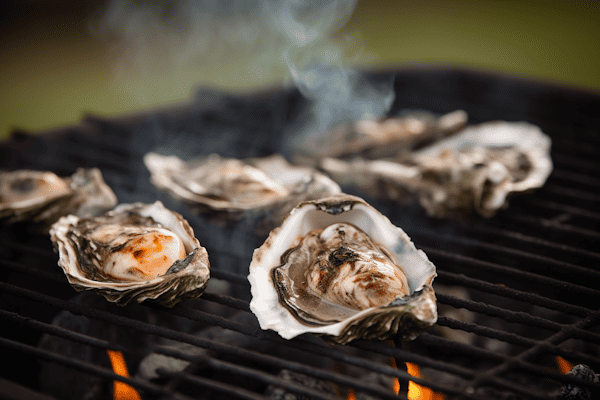
Similar to clams, but with a bit more ocean flavor. Don’t forget a bit of lemon to squeeze over them.
| What to do | How to do it |
|---|---|
| Choose fresh oysters | Select fresh live oysters from a reputable source. Look for oysters with intact shells that are closed or close when tapped. Avoid oysters with open or cracked shells, as they may be dead or spoiled. |
| Scrub and clean the oysters | Scrub the oyster shells with a brush under cold running water to remove any dirt or debris. |
| Preheat the camping grill | Preheat your camping grill or portable charcoal grill to high heat. Ensure the grill grates are clean and free from any previous debris. |
| Place oysters on the grill | Place the oysters directly on the preheated grill grates, flat side up, ensuring they are in a single layer and level to retain their juices. Close the grill lid and cook for approximately 5-7 minutes, or until the oyster shells start to open. |
| Discard unopened oysters | Remove the oysters from the grill as they open. Discard any oysters that do not open after cooking, as they may be dead and not safe to eat. |
| Serve and enjoy | Once cooked, use an oyster knife to separate the top and bottom shells. Serve the oysters on a platter with lemon wedges, hot sauce, or mignonette sauce. |
| Handle with care | Be cautious when handling hot oysters, as they can be very hot. Use oven mitts or a towel to protect your hands from burns. Be careful when shucking oysters to avoid injuries. |
30. Grilled Chicken Thighs
These are a bit more forgiving than breasts and really juicy. Grill them skin on for some crispy goodness.
| What to do | How to do it |
|---|---|
| Choose bone-in chicken thighs | Select bone-in chicken thighs for grilling. Bone-in thighs retain moisture and flavor during cooking, resulting in juicy and flavorful meat. |
| Preheat the camping grill | Preheat your camping grill or portable charcoal grill to medium-high heat. Ensure the grill grates are clean and lightly oiled to prevent sticking. |
| Season the chicken thighs | Season the chicken thighs with a dry rub or marinade of your choice. Ensure the thighs are evenly coated with the seasonings. |
| Grill over direct heat | Place the chicken thighs directly on the preheated grill over medium-high heat. Grill for approximately 6-8 minutes per side, or until the internal temperature reaches 165°F (74°C) and the thighs are cooked through with a nicely browned exterior. |
| Use a meat thermometer (optional) | For precise cooking, use a meat thermometer to check the internal temperature of the chicken thighs. The safe internal temperature for chicken is 165°F (74°C). |
| Adjust cooking time for thickness | Adjust the grilling time based on the thickness of the chicken thighs. Thicker thighs may require a slightly longer cooking time, while thinner ones will cook more quickly. |
| Rest and serve | Once the chicken thighs are grilled to perfection, remove them from the grill and let them rest for a few minutes. This allows the juices to redistribute, resulting in more tender and flavorful meat. Serve the chicken thighs hot and enjoy! |
31. Grilled Fajitas
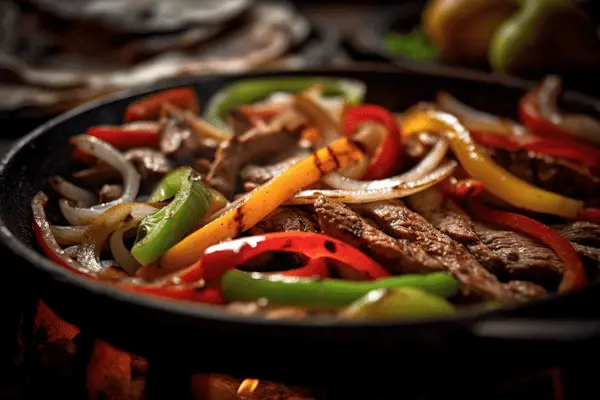
Bring some pre-cut meat and veggies, grill ’em up, and serve in tortillas. Easy, customizable, and very satisfying.
| What to do | How to do it |
|---|---|
| Choose the meat and marinade | Select your preferred meat for fajitas, such as flank steak or chicken. Marinate the meat in a flavorful marinade of your choice, combining ingredients like lime juice, garlic, chili powder, and cumin. Allow the meat to marinate for at least 1-2 hours, or overnight if possible, for maximum flavor. |
| Preheat the camping grill | Preheat your camping grill or portable charcoal grill to medium-high heat. Ensure the grill grates are clean and lightly oiled to prevent sticking. |
| Grill the meat | Place the marinated meat directly on the preheated grill over medium-high heat. Grill the meat for approximately 4-6 minutes per side, or until it reaches your desired level of doneness. Allow the meat to rest for a few minutes before slicing it into thin strips. |
| Grill the vegetables | While the meat is resting, grill sliced bell peppers and onions on the preheated grill until they are slightly charred and tender. Remove the vegetables from the grill and set them aside. |
| Slice the meat and vegetables | Slice the grilled meat against the grain into thin strips. Slice the grilled vegetables into strips as well. |
| Warm tortillas | Warm the tortillas by placing them on the grill for a few seconds on each side or wrap them in foil and place them on the grill to warm. |
| Assemble the fajitas | Fill the warmed tortillas with the sliced grilled meat and vegetables. Garnish with desired toppings such as salsa, guacamole, sour cream, and fresh cilantro. |
| Serve and enjoy | Serve the grilled fajitas immediately. Roll up the tortillas and enjoy the flavorful combination of grilled meat, vegetables, and toppings. |
32. Grilled Artichokes
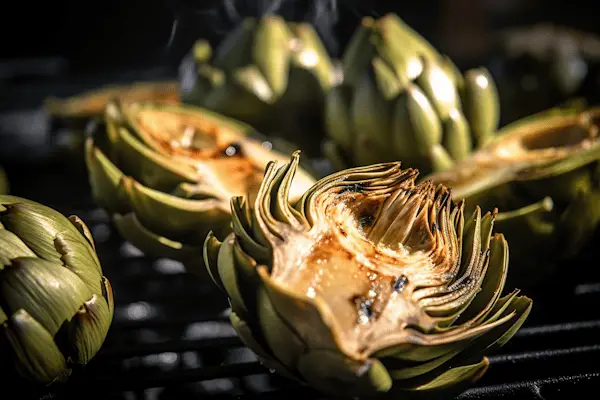
It’s a bit gourmet, but if you’re up for it, grilled artichokes are amazing. They take a bit of prep, but the result is worth it.
| What to do | How to do it |
|---|---|
| Prepare the artichokes | Trim the artichokes by removing the tough outer leaves and cutting off the top quarter of the artichoke. Trim the stem, leaving about an inch attached. Rinse the artichokes under cold water to remove any dirt or debris. |
| Steam or parboil the artichokes | Optional: Steam or parboil the artichokes for about 15-20 minutes to partially cook them. This helps to reduce the grilling time and ensures they are tender when grilled. |
| Cut artichokes in half | Cut the steamed or parboiled artichokes in half lengthwise. Use a spoon to remove the fuzzy choke in the center. |
| Brush with oil and season | Brush the cut side of the artichokes with olive oil and season them with salt, pepper, and any desired herbs or spices. Ensure the artichokes are evenly coated. |
| Preheat the camping grill | Preheat your camping grill or portable charcoal grill to medium-high heat. Ensure the grill grates are clean and lightly oiled to prevent sticking. |
| Grill the artichokes | Place the artichokes, cut side down, directly on the preheated grill over medium-high heat. Grill for approximately 5-7 minutes per side, or until they are tender and have grill marks. Turn the artichokes carefully using tongs. |
| Serve and enjoy | Once the artichokes are grilled to your liking, remove them from the grill and let them cool for a few minutes. Serve the grilled artichokes as a delicious appetizer or side dish. Drizzle with lemon juice and enjoy the flavorful grilled artichokes while camping! |
33. Grilled Quesadillas
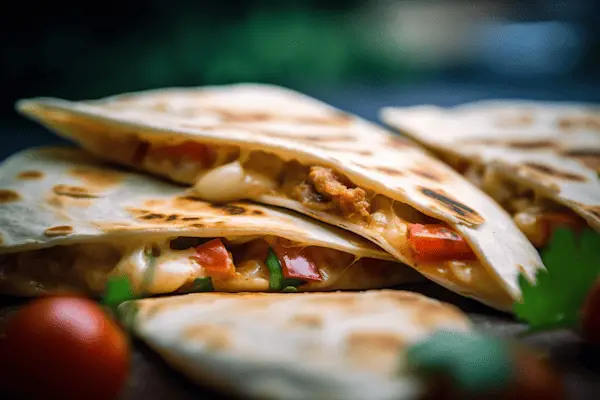
Bring pre-made quesadillas and heat them up on the grill. They’re quick, easy, and can be customized to everyone’s liking.
| What to do | How to do it |
|---|---|
| Prepare the filling | Choose your desired filling ingredients such as cheese, cooked meat, vegetables, and salsa. Prepare and assemble the ingredients ahead of time for easy grilling. |
| Preheat the camping grill | Preheat your camping grill or portable charcoal grill to medium heat. Ensure the grill grates are clean and lightly oiled to prevent sticking. |
| Assemble the quesadillas | Place a tortilla on a flat surface and spread the filling ingredients evenly on one half of the tortilla, leaving a border around the edges. Fold the other half of the tortilla over the filling to create a half-moon shape. Press lightly to seal. |
| Grill the quesadillas | Place the assembled quesadillas directly on the preheated grill. Cook for approximately 2-3 minutes per side, or until the tortillas are golden brown and crispy, and the cheese is melted. Flip the quesadillas carefully using a spatula. |
| Monitor the cooking | Keep a close eye on the quesadillas while grilling to prevent burning. Adjust the heat if necessary to ensure even cooking and avoid excessive charring. |
| Remove from the grill | Once the quesadillas are grilled to perfection, remove them from the grill and let them cool for a minute. Cut them into wedges or slices using a sharp knife or pizza cutter. |
| Serve and enjoy | Serve the grilled quesadillas hot with your favorite toppings such as salsa, guacamole, sour cream, or fresh cilantro. Enjoy the delicious and crispy quesadillas while camping! |
34. Grilled Sardines
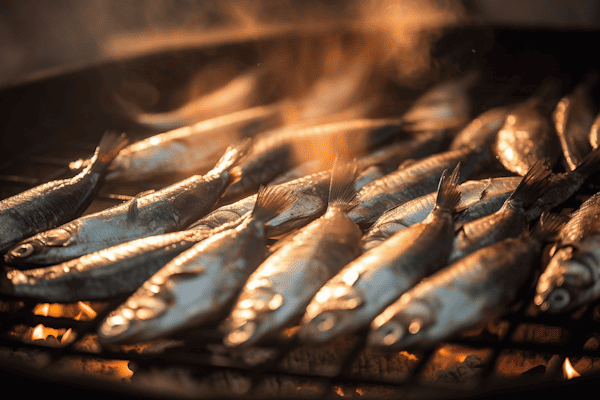
These little fish are cheap, healthy, and cook up super quick on the grill. Plus, they’ll make you feel like you’re in the Mediterranean.
| What to do | How to do it |
|---|---|
| Choose fresh sardines | Select fresh sardines with bright, clear eyes, shiny skin, and a fresh ocean smell. Look for sardines that are firm and intact. |
| Clean and gut the sardines | Rinse the sardines under cold running water and pat them dry with a paper towel. Use a sharp knife to make a shallow cut along the belly of each sardine and remove the innards. Gently rinse the sardines again to ensure they are clean. |
| Season the sardines | Season the sardines with salt, pepper, and any desired herbs or spices. You can also brush them with olive oil to prevent sticking and add flavor. |
| Preheat the camping grill | Preheat your camping grill or portable charcoal grill to medium-high heat. Ensure the grill grates are clean and lightly oiled to prevent sticking. |
| Grill the sardines | Place the seasoned sardines directly on the preheated grill. Grill for approximately 2-3 minutes per side, or until the skin is crispy and the flesh is cooked through. Turn the sardines carefully using a spatula or tongs. |
| Watch for flare-ups | Sardines contain high oil content, which may cause flare-ups. Keep a close eye on the grill to prevent excessive charring. Move the sardines to a cooler part of the grill if needed. |
| Serve and enjoy | Once the sardines are grilled to your liking, remove them from the grill and let them cool for a minute. Serve the grilled sardines as a delicious appetizer or main dish. Squeeze fresh lemon juice over them and serve with crusty bread or a side salad. Enjoy the flavorful grilled sardines while camping! |
Campfire Grilling Tips To Get You Started
Grilling at the campsite is one of those things that can turn a good camping trip into a great one. I’ve got some tips that will have you serving up some seriously impressive campfire meals in no time.
First off, let’s talk preparation. Before you even leave the house, do as much prep work as you can. Marinate your meats, chop your veggies, pre-skewer your kebabs – anything you can do at home will save you time at the campsite. Also, pack your food in a cooler properly. Raw meats should be packed in sealed containers or resealable bags to prevent any cross-contamination.
Temperature control is a bit tricky when grilling over a campfire compared to your grill at home. The key is to make a nice bed of coals to cook over – not open flame. That’ll give you a more even, manageable heat. Don’t rush it, let your fire burn down a bit. You’re looking for a glowing ember situation.
If messing with a campfire feels a bit too much like work for you, feel free to bring a camp stove with you. Camp stoves will provide you with an even heat so you’ll have more control over how long the food takes to cook.
Don’t forget about safe food handling! Keep raw and cooked foods separate, and make sure everything’s cooked to the right temperature. It’s a bit less convenient without a kitchen right there, but food safety is super important.
And last, but certainly not least, don’t forget to clean up after yourself. Leaving food scraps or trash around is not cool, not to mention it can attract wildlife. Pack it in, pack it out, as they say.
Keep these tips in mind, and you’ll not only make some great food, but you’ll also be a responsible and respectful camper too.